I have moved this blog to Wordpress so please update your bookmark to : https://highlanderimagesphotography.wordpress.com
All future blog postings will be to this new URL.
Sunday, March 13, 2016
Wednesday, December 30, 2015
2015 Review
Well once again another year has gone so let's look back at the fond memories of this year with 12 key photos that encapsulate some of the best moments.

Photo 1
It was a poignant Chinese New Year celebration this year as the family gathered together in late february as my wife's mother sadly passed away a matter of 3 months after this photo was taken. This family photograph with everyone dressed in red will be forever a lasting memory for everyone.

Photo 2
In March we made a trip to Bangkok and Hua Hin in Thailand to visit our friends Rick and Bee. We had a memorable trip to the Hua Hin Hills Winery, arriving for lunch and staying on for dinner and jazz and taking time to make our own customised wine bottle label.

Photo 3
In April my wife's daughter Tsun Yee was celbrating her 30th Birthday so we managed to arrange a surprise "New York Style" party and invited all her friends to participate. A great evening was enjoyed by all.

Photo 4
In May we headed back to UK for a brief stop in London before flying to Copenhagen to catch our Baltic cruise. It was great to visit all the city centre sights early in the morning after we flew in to London as we recovered from our jetlag.

Photo 5
We did a 12 day Baltic cruise in May starting in Copenhagen and taking in Kiel, Tallin, St. Petersburg, Helsinki, Stockholm, Warnemunde and returning to Copenhagen. One of the highlights was seeing the magnificent buildings, art and architecture in St. Petersburg. This image is the inside of the incredible Church of the Savior on Spilled Blood.

Photo 6
We stayed over in Copenhagen after the cruise and managed to see many of the sites of this wonderful city. This image shows the Nyhavn waterfront area which had some great restaurants.

Photo 7
Following our Baltic Cruise we returned to UK and spent a few days in Devon at the seasdide town of Ilfracombe. This image shows the town taken from Hillsborough.

Photo 8
My son Christopher got married to Tamsin in Oxford in early June. The wedding was wonderful and held at the historic Rhodes House which is part of Oxford University with a reception after the event at the Cherwell Boathouse.
My son Christopher got married to Tamsin in Oxford in early June. The wedding was wonderful and held at the historic Rhodes House which is part of Oxford University with a reception after the event at the Cherwell Boathouse.

Photo 9
My son and his new wife Tamsin and son Ruben came out to Malaysia to visit directly after the wedding so it was great to have my grandson here. This photo of him sums up his charismatic character as he made friends with everyone he met, particularly the Asian ladies we noted!
My son and his new wife Tamsin and son Ruben came out to Malaysia to visit directly after the wedding so it was great to have my grandson here. This photo of him sums up his charismatic character as he made friends with everyone he met, particularly the Asian ladies we noted!

Photo 10
Having thought my offshore days were over I had the opportunity to do a photo shoot for a friend who ran an oil company based here in Malaysia - so I had a nostalgic helicopter trip to two floating production platforms doing many aerial shots as well as photos taken on the platforms.

Photo 11
We escaped the haze that was engulfing Malaysia in November and sneaked away to Western Australia for a very relaxing stay in Dunsborough followed by a few days in Perth staying with friends. We had the opportunity for some great walks along the stunning coastline, this image shows the Sugar Loaf Rock on the Cape Naturaliste peninsula, as well as sampling some great local food and wine.

Photo 12
As a Christmas treat we headed off to Hong Kong and Macau for a few days. It was great to see this vibrant city after so many years and despite all the modern buildings which have mushroomed on Hong Kong island the classic old trams were still there as shown in this image.
Sunday, March 22, 2015
Capture One Pro Ver 8 from Phase One - A Brief Review

Introduction
With the decision by Apple to cease the development of Aperture and the early reviews of the "replacement" Photos app not being very positive (in terms of not being a true pro users tool and in no way a replacement for Aperture) I decided to take a closer look at Capture One Pro from Phase One. I had dabbled last year with an evaluation copy of Lightroom but was not overly impressed with the application. It was not that intuitive and felt clumsy in comparison to Aperture. Further more its embedded integration with the rest of the Adobe suite and the subscription issue did not really excite me.
I downloaded a 30 day trial version of Capture One and evaluated the app with a set of images I had recently processed with Aperture to do a direct comparison. A brief review is described below showing my thoughts on a real life workflow process.
Image Import
I tested the file importation from a recent SD card with 480 RAW images taken on a recent trip to Thailand. You can choose to import to the Capture One Catalog or another external file location so I guess similar to Aperture with it's Library or referenced file option. There are options to add in Copyright info or preset filters as well as file renaming conventions. You can save the preset filters and a variety of Copyright settings.
The first time I tried to import images I noted there was no way to just choose RAW files in the import dialogue box .... it would choose all the RAW and JPG files together so you would end up with duplicate RAW files and JPG files in your catalog. I eventually found a Global Filter that allowed me to exclude all JPG files then you had to choose all the RAW files in the import dialogue box so that only the RAW files would be imported. A little clumsy - it would have been so much easier had the import dialogue box had options like Aperture for RAW only, RAW+JPG pairs, etc.

As the files are imported previews are built and like Aperture you can choose the size of these previews. It took just over 7 mins to import the images and then 2.5 mins to finish building previews for the 480 photos, so a total of 9.5 mins. You can however start to work on the images before all the previews are completed in a similar way to Aperture.
For comparison I imported the same card into Aperture and this took 3mins 48 secs to import the 466 images and then a further 3 mins 22 secs to generate the previews for a total time of 7 mins 10 secs. So a big advantage (approx. 25% faster) for Aperture for the image ingestion.
Preview sizes for both Capture One and Aperture were set at the same size (fit 1920 x 1920).
File Management
Capture One stores images in a "Catalog" whereas Aperture stores in a "Library". You can set up this Catalog on a local or remote disk system and you can set up a number of differently named Catalogs. You can store files in the Catalog or in another defined folder so a similar setup when compared to the Aperture Library and Referenced Files.

Capture One also has the ability to set up Projects within the Catalog and inside the Projects set up Groups, Albums and Smart Albums. So a very similar hierarchy to Aperture, other than an additional level of Groups, just different nomenclature.
Filters allow you to sort your Catalog by star ratings or colour tag or location.
First Impressions
The layout of Capture One is fairly intuitive and familiar. A large Viewer window takes up most of the workspace real estate with a smaller browser or thumbnail viewer at the bottom. At the top of the screen are an array of tool tabs and cursor tabs. On the left is a panel showing information about the library where the images are stored and filter options including ratings, colour tags, date, keywords and location data.

Tool Tabs
There are a number of tool tabs at the top left of the window allowing access to a range of categorised tools :
Library (to view catalog and folder locations and filter on start rating, colour tag or location data)
Capture (shows exposure evaluation of the image and where it is being stored, also tethered capture setup tools)
Colour (colour tools including white balance, colour balance, black & white options and colour editing)
Exposure (controls for exposure, contrast, brightness, saturation, highlights, shadows, curve tool, clarity and vignetting tools)
Lens (lens correction tools)
Composition (crop, rotation and keystone tools)
Details (focus, sharpening, noise reduction, film grain, moire and spot removal tools)
Local Adjustments (local adjustments like the brush tool in Aperture for any of the adjustments)
Adjustments (adjustments clipboard)
MetaData (keywords and metadata tools)
Output (file output tools with sizing and naming facilities)
Batch (batch process facility)
You can also setup your own customised tool tab with all the tools you perhaps use on a routine basis within your image workflow. This is a very useful and powerful capability.
Rating, Tagging, Keywording & MetaData
Like Aperture you can rate photographs by a star system (0 to 5 stars) and there is also a colour tag system you can use to tag photos for your own personalised reason. Keywords can be added for images as well as location.

I have not found anyplace as yet that you can manually enter GPS coordinates of the photo location - there is a place in the EXIF data for GPS coordinates but this will probably only work for cameras with built-in GPS. The map function in Aperture is great for adding in locations of your images.
You can add IPTC metadata such as description, category, location, city, state, country, etc and you can then copy this metadata from one image to a set of images in a similar fashion that lift and stamp works in Aperture. However one first testing the copying of key attributes seems a little more clumsy than the Lift & Stamp option that Aperture offers.
Image Editing

Image editing is very comprehensive and has all the usual suspects such as exposure, contrast, brightness, saturation and a useful highlights and shadows tool under the High Dynamic Range tool set which is similar to Aperture's Recovery and Blackpoint tools.
There is a really excellent automatic button which can automatically adjust key functions individually within the individual tool or globally using the large A icon in the top right tool bar. The global automated adjustment covers exposure, white balance, levels, highlights, shadows, rotation and even keystone (you can choose which ones you want in the global auto adjustment). I tried this on quite a number of images and the results were truly impressive and offering a rapid adjustment for images.

There are local adjustment capabilities for any of the adjustments and this seems similar to Aperture's Brushes tool for adjusting parameters locally within the image.

There is the usual cropping tool but a useful addition over what is available in Aperture is the Keystone tool allowing you to straighten bending verticals or horizontals.

There is range of colour tools for adjusting white balance and colour balance with a basic black and white tool and colour editor
Comparisons to Aperture
Capture One certainly has all the tools you would need to store, keyword, tag, and edit your images. In terms of usability it is hard to judge at the moment being a novice user ..... it seems slower than Aperture probably mainly due to unfamiliarity of where all the tools are and the best workflow process to adopt.
Listed below are some of the first noted advantages of each product ..... I'm sure I will uncover more as I continue to test Capture One.
Advantages of Aperture
- Robust and comprehensive image management
- Flexible and non-linear workflow
- Stacks
- Extensive plug-ins to retain post processed images in Aperture Library (round tripping)
- Mapping functionality for photo locations (Places).
Advantages of Capture One
- Keystone adjust
- The automatic adjust which adjusts exposure, white balance, levels and highlights and shadows works very well
Costs
The cost of a 2 seat personal license is Euro 229. Not cheap and by comparison Aperture was a bargain.
Conclusions
If I had to abandon Aperture I would certainly be very positive towards capture One, and certainly more so than Lightroom which I really didn't like.
I would imagine that once familiar and you had set up your optimised workflow with customised tool tabs it could be very powerful and an excellent replacement for Aperture.
At present I plan to continue to use Aperture up to the point that the OS no longer supports it properly or at the time that hopefully the new Apple Photos app becomes more mature and with the additional functionality required by pro photographers.
Thursday, March 19, 2015
Photos

Have just downloaded the beta release of OS X 10.10.3 with the new Photos app and benchmarking this on my MacBookPro. I pulled in a very small Aperture library which was residing on my MacBookPro which seemed to go ok although the app was working overtime doing something as it processed the images (not sure what as there is not an activity window like you get in Aperture).
Photos appears to be fairly rudimentary although eventually after a bit of tweaking and browsing I found the histogram window, levels control, white balance adjustment and definition, noise reduction and vignette controls.
Other editing tools comprise the usual basic exposure, highlights, shadows, brightness, contrast and black point sliders and colour sliders with saturation, contrast and cast controls.
There is a black and white option and definition and sharpening sliders.
However sad to see no star rating system carried over from the imported Aperture library - rather just converted to a key word with the star rating. Given that this is a very early release I hope Apple can focus on getting some power functionality into Photos to appease the many disillusioned Aperture users.
It appears to be very much an iPhoto type app rather than the serious pro Aperture app in its present guise.... .we shall see as this develops - let's hope Apple get a little bit more serious with this app as otherwise it is going to leave a lot of serious Aperture users eventually (if not already) to jump ship to Lightroom or Capture One.
I will continue to evaluate this new Photos app in the coming weeks and alongside this I am also evaluating Capture One from Phase One. More reports to come in the coming weeks.
Wednesday, January 28, 2015
i-Mac 27" Retina 5K vs MacPro - A Performance Analysis

I recently bought a new i-Mac 27" with the Retina 5K screen to replace my 6+ year old MacPro which although still going very well I thought it was time for an upgrade. The new i-Mac 27" 5K model appealed to me as a photographer as the screen resolution would be very valuable when editing and post-processing large RAW images.
I was interested to benchmark the performance of the new i-Mac against my MacPro and was very pleasantly surprised by the results.
Machine Specifications
The specifications of the two machines were as follows:
MacPro (Early 2008)

CPU : 2 x 2.8 GHz Quad Core Intel Xeon
Memory : 18 GB 800 MHz DDR2
Graphics Card : NVIDIA GeForce GT 640 2048 MB
Storage : 1 x 4TB system disk, 2 x 3 TB RAID disk for photo archive and 1 x 4TB disk for system backup
Monitor : 30" Apple CinemaDisplay
The MacPro had been upgraded over the years with higher capacity storage disks added, memory upgraded to 24 GB and the graphics card upgraded from the original graphics card.
i-Mac 27" Retina 5K (Late 2014)

CPU : 3.5 GHz Intel Core i5
Memory : 32 GB 1600 MHz DDR3
Graphics Card : AMD Radeon R9 M290X 2048 MB
Storage : 1 x 3TB Fusion Drive, 2 x 4 TB Thunderbolt Western Digital RAID disk for photo archive, 1 x 6TB disk for system backup
Monitor : 27" Retina 5K (5120 x 2880)
The 27" i-Mac was ordered via the Apple online store and upgraded from the base model with maximum memory of 32 GB and a higher capacity 3 TB Fusion drive instead of the standard 1 TB Fusion drive. I did not upgrade the CPU to the i7 as I felt that there would not be a significant performance improvement for the photo editing and processing that I routinely use the machine for.
Benchmark Tests


I tested out 4 different benchmark tests using identical procedures to measure the difference in performance between the two machines. These tests represented standard processes I carry out when editing and post-processing my photos. The tests used different post-processing apps and were as follows:
1. Aperture - Export of 100 full resolution jpg images
2. PhotoMatix Pro - HDR processing of a 7 bracketed sequence of images
3. AutoPano Pro - Processing and blending of a 15 image panoramic sequence
4. FotoMagico - Rendering of a 4.35 minute long 720p movie from a slideshow
The same software versions and the same test images were used on both machines and times measured for each process.
Benchmark Results

The results clearly demonstrated the improved performance of the new 27" i-Mac ..... over 50% faster for most processes compared to the speed on the MacPro. Even given that the MacPro has 2 quad core CPU's it was no match for the newer CPU and probably the extra memory on the i-Mac 27".
Screen Resolution
The new 27" Retina 5K screen on the i-Mac was simply stunning and for my photography editing and post-processing this will be a major benefit. Also for showing off images and slideshows at high resolution this will also be a major improvement. When you use a high mega pixel DSLR it is nice to be able to take advantage of this resolution rather than having the final image on the screen downgraded to the lower resolution of the screen.
Tuesday, October 21, 2014
Butchart Gardens - Brentwood Bay, British Columbia

The Butchart Gardens is a group of floral display gardens in Brentwood Bay, British Columbia, Canada, located near Victoria on Vancouver Island. The gardens receive close to a million visitors each year. The gardens have been designated a National Historic Site of Canada due to their international renown.
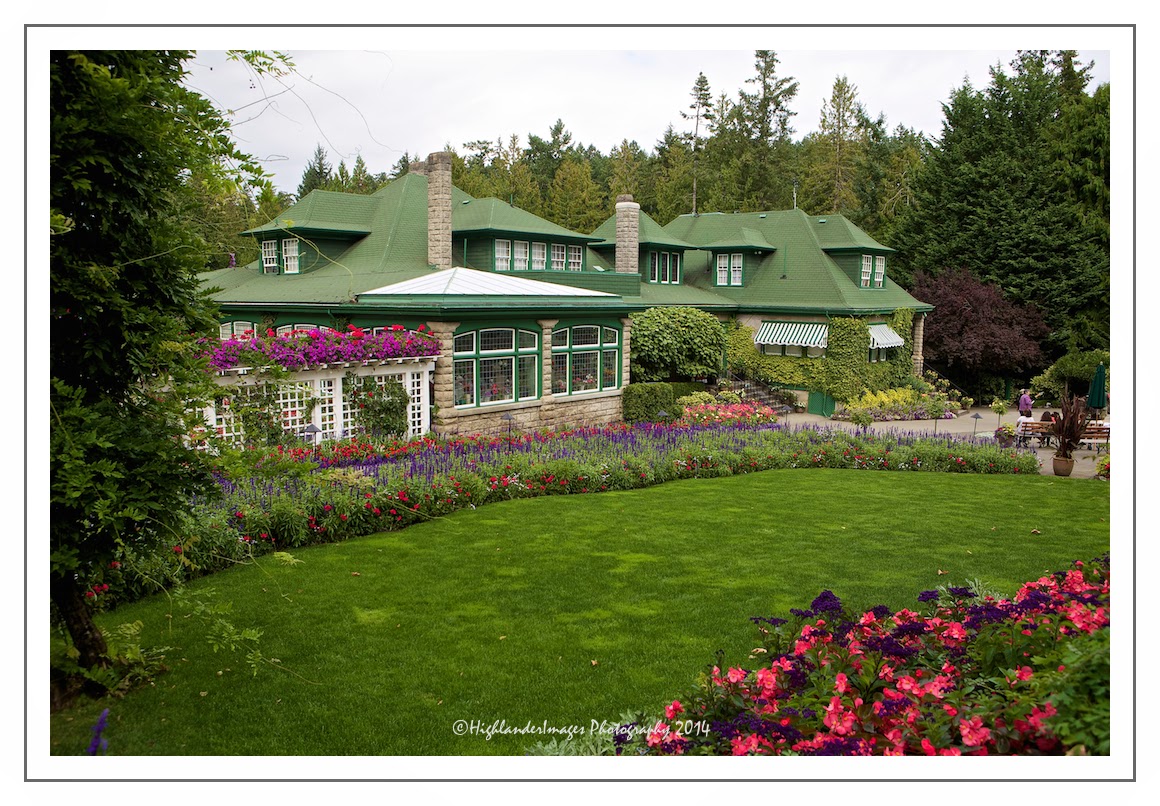

Robert Pim Butchart (1856–1943) began manufacturing Portland cement in 1888 near his birthplace of Owen Sound, Ontario, Canada. He and his wife Jennie Butchart (1866–1950) came to the west coast of Canada because of rich limestone deposits necessary for cement production.
In 1904, they established their home near his quarry on Tod Inlet at the base of the Saanich Peninsula on Vancouver Island.
As Mr. Butchart exhausted limestone deposits, his enterprising wife Jennie, made plans to create something of beauty in the gigantic exhausted pit. From farmland nearby, she had tonnes of top soil brought in by horse and cart and used it to line the floor of the abandoned quarry. Little by little, the quarry blossomed into the spectacular Sunken Garden.


They named their home "Benvenuto" ("welcome" in Italian), and began to receive visitors to their gardens. In 1926, they replaced their tennis courts with an Italian garden and in 1929 they replaced their kitchen vegetable garden with a large rose garden to the design of Butler Sturtevant of Seattle. Samuel Maclure, who was consultant to the Butchart Gardens, reflected the aesthetic of the English Arts and Crafts Movement.

In 1939, the Butcharts gave the Gardens to their grandson Ian Ross (1918–1997) on his 21st birthday. Ross was involved in the operation and promotion of the gardens until his death 58 years later.
In 1953, miles of underground wiring was laid to provide night illumination, to mark the 50th anniversary of The Gardens. In 1964, the ever-changing Ross Fountain was installed in the lower reservoir to celebrate the 60th anniversary. In 1994, the Canadian Heraldic Authority granted a coat of arms to the Butchart Gardens. In 2004, two 30-foot (9.1 m) totem poles were installed to mark the 100th anniversary, and The Gardens were designated as a national historic site.


Ownership of The Gardens remains within the Butchart family; the owner and managing director since 2001 is the Butcharts' great-granddaughter Robin-Lee Clarke.
In 1982 the Butchart Gardens was used as the inspiration for the gardens at the Canadian pavilion opened at Epcot Centre in Orlando Florida.
In December, 2009 the Children's Pavilion and the Rose Carousel were opened. The menagerie includes thirty animals ranging from bears, to horses, to ostriches, to zebras and mirrors the world from which The Gardens draws its visitors. The designs were hand picked by the owner, in consultation with an artist from North Carolina. The carvings were done by some of the few remaining carvers of carousel art. Each animal is carved from basswood and took many months to complete. There are also two chariots able to accommodate disabled persons.


Subscribe to:
Posts (Atom)